If you want to retrieve data from the Internet and process
it programmatically, rather than just display it in a view,
you should use the NSURLConnection
class.
The NSURLConnection class can
make both synchronous and asynchronous requests to download the contents
of a URL, and the associated delegate methods provide feedback and control
for asynchronous requests.
1. Synchronous Requests
The easiest, but not the best, way to use the NSURLConnection class
is to make a synchronous request for data:
NSString *url = @"http://www.apple.com";
NSURLRequest *request =
   [NSURLRequest requestWithURL:[NSURL URLWithString:url]];

NSURLResponse *response = nil;
NSError *error = nil;
NSData *content = [NSURLConnection sendSynchronousRequest:request
  returningResponse:&response error:&error];

NSString *string = [[NSString alloc] initWithData:content
  encoding:NSUTF8StringEncoding];
NSLog(@"response: %@", string);
sendSynchronousRequest: is a convenience method built on top of the asynchronous
request code. It’s important to note that if you use this method the
calling thread will block until the data is loaded or the request times
out. If the calling thread is the main thread of your application, your
application will freeze while the request is being made. This is
generally considered not a good thing from a UI perspective; I strongly
encourage you to use the asynchronous connection and associated delegate
methods.
2. Asynchronous Requests
Most of the time when you use the NSURLConnection class,
you’ll make asynchronous requests this way:
NSString *string = [NSString stringWithFormat:@"http://www.apple.com/];
NSURL *url = [[NSURL URLWithString:string] retain];
NSURLRequest *request = [NSURLRequest requestWithURL:url];
[[NSURLConnection alloc]
  initWithRequest:request delegate:self];
For this to work, you need to implement the following methods at a
minimum. We’ll take a closer look at NSURLConnection in Section 7.4.3:
- (NSURLRequest *)connection:(NSURLConnection *)connection
  willSendRequest:(NSURLRequest *)request
  redirectResponse:(NSURLResponse *)redirectResponse
{
    return request;
}

- (void)connection:(NSURLConnection *)connection
  didReceiveResponse:(NSURLResponse *)response
{
    [responseData setLength:0];
}

- (void)connection:(NSURLConnection *)connection
  didReceiveData:(NSData *)data
{
    [responseData appendData:data];
}

- (void)connection:(NSURLConnection *)
  connection didFailWithError:(NSError *)error
{
  ... implementation code would go here ...
}

- (void)connectionDidFinishLoading:(NSURLConnection *)connection {
   ... implementation code would go here ...
}
3. Using Web Services
With the (re)emergence of REpresentational State Transfer (REST)
as the dominant paradigm for modern web service
architectures, chiefly championed by emerging Web 2.0 companies and
platforms, the number of available services has grown significantly over
the past few years.
3.1. The Google Weather ServiceTo illustrate the NSURLConnection
class, we’re going to look at one of these RESTful services, the
(mostly undocumented, as far as I can tell) Google Weather Service. A
request to the Google Weather API of the form
http://www.google.com/ig/api?weather=QUERY_STRING
will return forecasts with temperatures in Fahrenheit; the same
request to www.google.co.uk will return a
forecast with temperatures in Centigrade.
Warning:
While the Google Weather Service is a simple little service
that has been around for some time in its current form, there is
very little documentation surrounding it. As such, Google may not
regard it as an “officially supported” API and the service may be
subject to change without much notice.
So, for instance, if we made a request of the Google Weather API
for the current conditions and forecast in London, the request would
look like http://www.google.com/ig/api?weather=London,UK. If we
do that, the service will return an XML document containing the
current and forecasted conditions:
<?xml version="1.0"?>
<xml_api_reply version="1">
   <weather module_id="0" tab_id="0"
        mobile_row="0"
        mobile_zipped="1"
        row="0"
        section="0" >
      <forecast_information>
         <city data="London,  England"/>
         <postal_code data="London,UK"/>
         <latitude_e6 data=""/>
         <longitude_e6 data=""/>
         <forecast_date data="2009-08-29"/>
         <current_date_time data="2009-08-29 17:50:00 +0000"/>
         <unit_system data="US"/>
      </forecast_information>

      <current_conditions>
         <condition data="Clear"/>
         <temp_f data="64"/>
         <temp_c data="18"/>
         <humidity data="Humidity: 40%"/>
         <icon data="/ig/images/weather/sunny.gif"/>
         <wind_condition data="Wind: W at 17 mph"/>
      </current_conditions>

      <forecast_conditions>
         <day_of_week data="Sat"/>
         <low data="55"/>
         <high data="71"/>
         <icon data="/ig/images/weather/chance_of_rain.gif"/>
         <condition data="Chance of Rain"/>
      </forecast_conditions>
      <forecast_conditions>
         <day_of_week data="Sun"/>
         <low data="64"/>
         <high data="69"/>
         <icon data="/ig/images/weather/chance_of_rain.gif"/>
         <condition data="Chance of Rain"/>
      </forecast_conditions>
      <forecast_conditions>
         <day_of_week data="Mon"/>
         <low data="62"/>
         <high data="77"/>
         <icon data="/ig/images/weather/chance_of_rain.gif"/>
         <condition data="Chance of Rain"/>
      </forecast_conditions>
      <forecast_conditions>
         <day_of_week data="Tue"/>
         <low data="59"/>
         <high data="73"/>
         <icon data="/ig/images/weather/chance_of_rain.gif"/>
         <condition data="Chance of Rain"/>
      </forecast_conditions>
   </weather>
</xml_api_reply>
If we make a request about a nonexistent location—for instance,
http://www.google.com/ig/api?weather=Foo—we’ll
get the following (rather unhelpful) XML error document
returned:
<?xml version="1.0"?>
<xml_api_reply version="1">
   <weather module_id="0" tab_id="0" mobile_row="0"
            mobile_zipped="1" row="0" section="0" >
      <problem_cause data=""/>
   </weather>
</xml_api_reply>
3.2. Building an application
Much like Apple’s own Weather application, the application
we’re going to wrap around the Google Weather Service will be
a utility application. So, open Xcode and start a new project. Select
the Utility Application template from the iPhone OS category, and name
the project “Weather” when prompted for a filename.
Note:
The UI for this application will be pretty complicated,
and will have a lot more elements than interfaces we’ve
looked at before. So, I’ll briefly mention an alternative. I could
easily have implemented the Weather application as a table view; in
fact, programmatically this is probably the easiest way, but it’s
not the prettiest.
Pretty is important, both to people developing applications
for Apple products and to the typical customer base. If you intend
to sell your application on the App Store, you should think
seriously about how your application looks. First impressions are
important, and with so many applications available, both the UI and
the application’s icon are tools you can use to make your
application stand out from the others.
First we need to add a number of IBOutlets to our
MainViewController.h interface file. We’re going
to populate our GUI by querying the Google Weather Service and then
parsing the XML we get back. If you compare the following to the XML
file shown earlier, you should see a more or less one-to-one
correspondence between XML elements and UI elements:
#import "FlipsideViewController.h"

@interface MainViewController : UIViewController
    <FlipsideViewControllerDelegate> {

    IBOutlet UIActivityIndicatorView *loadingActivityIndicator;
IBOutlet UILabel *nameLabel;
IBOutlet UILabel *dateLabel;
IBOutlet UIImageView *nowImage;
IBOutlet UILabel *nowTempLabel;
IBOutlet UILabel *nowHumidityLabel;
IBOutlet UILabel *nowWindLabel;
IBOutlet UILabel *nowConditionLabel;
IBOutlet UILabel *dayOneLabel;
IBOutlet UIImageView *dayOneImage;
IBOutlet UILabel *dayOneTempLabel;
IBOutlet UILabel *dayOneChanceLabel;
IBOutlet UILabel *dayTwoLabel;
IBOutlet UIImageView *dayTwoImage;
IBOutlet UILabel *dayTwoTempLabel;
IBOutlet UILabel *dayTwoChanceLabel;
IBOutlet UILabel *dayThreeLabel;
IBOutlet UIImageView *dayThreeImage;
IBOutlet UILabel *dayThreeTempLabel;
IBOutlet UILabel *dayThreeChanceLabel;
IBOutlet UILabel *dayFourLabel;
IBOutlet UIImageView *dayFourImage;
IBOutlet UILabel *dayFourTempLabel;
IBOutlet UILabel *dayFourChanceLabel;
IBOutlet UIButton *refreshButton;
}

- (IBAction)showInfo;
- (IBAction)refreshView:(id) sender;
- (void)updateView;
@end
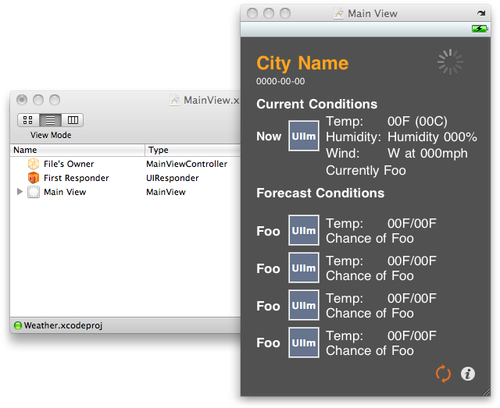
Now let’s open MainView.xib in Interface
Builder and put together the UI. I’m not going to walk you through the
steps for building the interface this time. You’ve built enough UIs by
this point that you should be familiar with how to go about it. Look
at Figure 1 to see my
final interface. You need to place 35 UI elements: 28 labels (UILabel), 5 images (UIImageView), 1 activity indicator
(UIActivityIndicatorView), and 1 button
(UIButton). However, don’t be put
off; it’s really not going to take as long as you think it
will.
Note:
Remember: to change the font color, minimum size, and other
settings, use the Attribute Inspector (⌘-1). You can change the
attributes of several elements at once by dragging to select them,
and then using the Attribute Inspector.
There are a few points to note:
Each UIImage element must
be resized to 40×40 pixels, the size of the GIF weather icons
provided by the Google Weather Service.
I set the style of the UIActivityIndicatorViewer to Large White in the Attributes Inspector and
ticked the Hide When Stopped checkbox. We’ll use this indicator to
show network or other activity.
I added a custom PNG icon for the Refresh button to the project, setting
the UIButton type to Custom and
the image to point at my refresh icon (you will need to drag your
icon into your Xcode project before it will be available as a
custom image). I resized the Refresh button to be the same size as
the Info button provided by the template, setting the View Mode to
“Scale to Fill” in the Attributes tab of the Inspector
window.
When connecting the UIButtons to the received actions—for
example, when dragging the refreshView:
action to the Refresh button—choose Touch Up Inside from the
drop-down menu of events that Interface Builder will present to
you when you make the connection.
With this number of UI elements to play with, it’s going to be
easy to get confused. What’s more, we are not going to connect all of
the labels to our code, as some of them aren’t going to be updated
(e.g., section headers and the “Temp:”, “Humidity:”, and “Wind:”
labels).
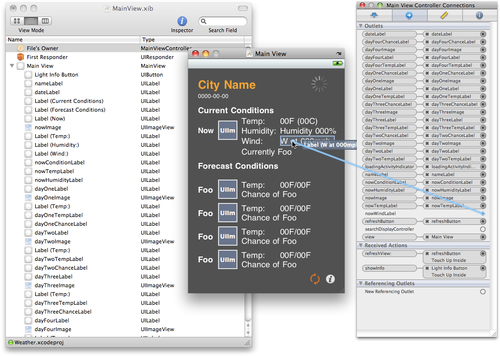
So, for the elements you will connect to an IBOutlet, use the Identity Inspector’s (⌘-4)
Interface Builder Identity section to change the Name
attribute of the element to be the same as the variable in the
MainViewController interface file.
Figure 2 shows the
assignments.
While this doesn’t make it easier to connect the outlets to the
UI elements, it does make it easier to check whether we’ve made an
incorrect connection. If you click on File’s Owner and switch to the
Connections tab of the Inspector window, as Figure 3 shows, you can
quickly check that each outlet is connected to the correct UI element
since the name on each side of the connection should be the
same.
Although we’ve written the interface for the view controller and
built and connected our view to the interface, we haven’t implemented
it yet. Let’s hold off on that until we’ve built our data
model.

Our model class needs to query the weather service, parse the
response, and populate the data model. Right-click on the Other
Sources group in the Groups & Files pane in Xcode and select
Add→New File, select the Objective-C
class from the iPhone OS Cocoa Touch category, and select NSObject
from the “Subclass of” pop up. Click Next. Name the new class
WeatherForecast when prompted, and open the
WeatherForecast.h
interface file in the Xcode editor. Like
our UI, the interface file reflects the structure of the XML document
we retrieved from the Google Weather Service. Add the lines shown in
bold to the file:
#import <Foundation/Foundation.h>

@class MainViewController;

@interface WeatherForecast : NSObject {

    // Parent View Controller
MainViewController *viewController;
// Google Weather Service
NSMutableData *responseData;
NSURL *theURL;
// Information
NSString *location;
NSString *date;
// Current Conditions
UIImage *icon;
NSString *temp;
NSString *humidity;
NSString *wind;
NSString *condition;
// Forecast Conditions
NSMutableArray *days;
NSMutableArray *icons;
NSMutableArray *temps;
NSMutableArray *conditions;
}

@property (nonatomic, retain) NSString *location;
@property (nonatomic, retain) NSString *date;
@property (nonatomic, retain) UIImage *icon;
@property (nonatomic, retain) NSString *temp;
@property (nonatomic, retain) NSString *humidity;
@property (nonatomic, retain) NSString *wind;
@property (nonatomic, retain) NSString *condition;
@property (nonatomic, retain) NSMutableArray *days;
@property (nonatomic, retain) NSMutableArray *icons;
@property (nonatomic, retain) NSMutableArray *temps;
@property (nonatomic, retain) NSMutableArray *conditions;
- (void)queryService:(NSString *)city
withParent:(UIViewController *)controller;
@end
Now open the implementation file
(WeatherForecast.m) in the Xcode editor. We need
to synthesize our properties and write our queryService:withParent: method that will
start the asynchronous NSURLConnection process. Add the lines shown
in bold to this file:
#import "WeatherForecast.h"
#import "MainViewController.h"

@implementation WeatherForecast


@synthesize location;
@synthesize date;
@synthesize icon;
@synthesize temp;
@synthesize humidity;
@synthesize wind;
@synthesize condition;
@synthesize days;
@synthesize icons;
@synthesize temps;
@synthesize conditions;
#pragma mark Instance Methods
- (void)queryService:(NSString *)city
withParent:(UIViewController *)controller
{
viewController = (MainViewController *)controller;
responseData = [[NSMutableData data] retain];
NSString *url = [NSString
stringWithFormat:@"http://www.google.com/ig/api?weather=%@",
city];
theURL = [[NSURL URLWithString:url] retain];
NSURLRequest *request = [NSURLRequest requestWithURL:theURL];
[[NSURLConnection alloc] initWithRequest:request delegate:self];
}
-(void)dealloc {
[viewController release];
[responseData release];
[theURL release];
[location release];
[date release];
[icon release];
[temp release];
[humidity release];
[wind release];
[condition release];
[days release];
[icons release];
[temps release];
[conditions release];
[super dealloc];
}
@end
We declared our WeatherForecast class as the delegate for
the NSURLConnection class. Now we
need to add the necessary delegate methods. For now let’s just
implement the delegate methods; we’ll get around to parsing the
response later. Add the following lines to
WeatherForecast.m just before the @end directive:
#pragma mark NSURLConnection Delegate Methods

- (NSURLRequest *)connection:(NSURLConnection *)connection
  willSendRequest:(NSURLRequest *)request
  redirectResponse:(NSURLResponse *)redirectResponse
{
    [theURL autorelease];
    theURL = [[request URL] retain];
    return request;
}

- (void)connection:(NSURLConnection *)connection
  didReceiveResponse:(NSURLResponse *)response
{
    [responseData setLength:0];
}

- (void)connection:(NSURLConnection *)connection
  didReceiveData:(NSData *)data
{
    [responseData appendData:data];
}

- (void)connection:(NSURLConnection *)connection
  didFailWithError:(NSError *)error
{

}

- (void)connectionDidFinishLoading:(NSURLConnection *)connection {

    NSString *content = [[NSString alloc]
      initWithBytes:[responseData bytes]
      length:[responseData length]
      encoding:NSUTF8StringEncoding];
    NSLog( @"Data = %@", content );

    // Insert code to parse the content here

    [viewController updateView];
}
We’re going to use the application delegate to create the
WeatherForecast object and to pass
it to our MainViewController
object. Add the lines shown in bold to
WeatherAppDelegate.m:
- (void)applicationDidFinishLaunching:(UIApplication *)application {

    MainViewController *aController =
      [[MainViewController alloc] initWithNibName:@"MainView" bundle:nil];
    self.mainViewController = aController;
    [aController release];

    WeatherForecast *forecast = [[WeatherForecast alloc] init];
self.mainViewController.forecast = forecast;
[forecast release];
    mainViewController.view.frame = [UIScreen mainScreen].applicationFrame;
    [window addSubview:[mainViewController view]];
    [window makeKeyAndVisible];
}
We have the view, model, and interface for the view controller.
Now we know how the model works, and how we’re going to push it into
the view controller. So, let’s implement the controller and tie up
those loose ends. Add the following code to
MainViewController.m:
- (void)viewDidLoad {
    [super viewDidLoad];
    [self refreshView:self];
}

- (IBAction)refreshView:(id)sender {
    [loadingActivityIndicator startAnimating];
    [forecast queryService:@"London,UK" withParent:self];

}

- (void)updateView {

    // Add code to update view here

    [loadingActivityIndicator stopAnimating];

}
Additionally, we also need to make sure we do the
following:
Import the WeatherForecast.h interface
file inside MainViewController.h.
Declare the forecast, mark it as a property, and synthesize
it.
Release all of the variables we declared in the class’s
interface file in MainViewController.m’s
dealloc: method.
To do this, add the following line to the top of
MainViewController.h:
#import "WeatherForecast.h"
Next, make the changes shown in bold to the end of
MainViewController.h:
    IBOutlet UIButton *refreshButton;
    WeatherForecast *forecast;
}

- (IBAction)showInfo;
- (IBAction)refreshView:(id) sender;
- (void)updateView;

@property (nonatomic, retain) WeatherForecast *forecast;

@end
Then make the change shown in bold to the top of
MainViewController.h:
#import "MainViewController.h"
#import "MainView.h"

@implementation MainViewController

@synthesize forecast;
Finally, add the lines shown in bold to
MainViewController.m’s dealloc: method:
- (void)dealloc {

    [loadingActivityIndicator dealloc];
[nameLabel dealloc];
[dateLabel dealloc];
[nowImage dealloc];
[nowTempLabel dealloc];
[nowHumidityLabel dealloc];
[nowWindLabel dealloc];
[nowConditionLabel dealloc];
[dayOneLabel dealloc];
[dayOneImage dealloc];
[dayOneTempLabel dealloc];
[dayOneChanceLabel dealloc];
[dayTwoLabel dealloc];
[dayTwoImage dealloc];
[dayTwoTempLabel dealloc];
[dayTwoChanceLabel dealloc];
[dayThreeLabel dealloc];
[dayThreeImage dealloc];
[dayThreeTempLabel dealloc];
[dayThreeChanceLabel dealloc];
[dayFourLabel dealloc];
[dayFourImage dealloc];
[dayFourTempLabel dealloc];
[dayFourChanceLabel dealloc];
[refreshButton dealloc];
[forecast dealloc];
    [super dealloc];
}
This is a good point to pause, take stock, and test the
application. Click the Build and Run button in the Xcode toolbar. When
the application opens you should see the UIActivityIndicator briefly appear in the
top-lefthand corner of the view, and then disappear when the WeatherForecast object finishes loading the
XML document from the Google Weather Service.
If you go to the Xcode Console, by selecting Run→Console from the Xcode menu bar, you should
see something very much like Figure 4. This is the XML
document retrieved from the weather service.

At this point, all that is left to implement is the XML parsing
code inside the WeatherForecast’s
connectionDidFinishLoading: method, and the
code to take the data model from the forecast object and display it in the view
inside the MainViewController’s
updateView: method.
3.3. Parsing the XML document
This article is about networking, so I’m not going to
discuss in depth how to parse the returned XML document here. If
you’re familiar with DOM-based XML parsers, the following should be
familiar.
Warning:
Making use of the NSXMLDocument
class is the normal method for tree-based parsing of
XML files on the Mac. However, despite being available in iPhone
Simulator, this class is not available on the device itself.
However, for simple files, such as those returned by the Google
Weather Service, I’ve never been a big fan of event-driven parsing.
Since the NSXMLDocumentlibxml2 library directly, via Matt
Gallagher’s excellent XPath wrappers for the library. class is
not available on the iPhone, I generally use the
Download the wrappers from http://cocoawithlove.googlepages.com/XPathQuery.zip.
Next, unzip the file and drag the XPathQuery.h
and XPathQuery.m files into your project,
remembering to tick the “Copy items into destination group’s folder”
checkbox. This will add the interface and implementation files for
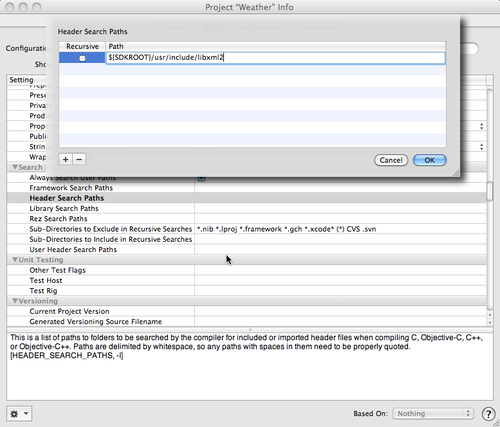
the wrappers to the project. To use these wrappers, you need to add the
libxml2.dylib library to the project. However,
adding the libxml2 library underlying these
wrappers is slightly more involved than adding a normal
framework: Double-click on the Weather project icon in the Groups
& Files pane in Xcode and go to the Build tab of the Project
Info window. Click on the Show drop-down menu and choose All
Settings. Go to the Search Paths subsection in this window, and in
the Header Search Paths field double-click on the entry
field. Click the + button and add
${SDKROOT}/usr/include/libxml2 to the
paths, as shown in Figure 5. Then
click OK. Then in the Linking subsection of this window,
double-click on the Other Linker Flags field and click +. Add
-lxml2 to the flags and then click
OK.
|
Once we’ve done that, we can open the
WeatherForecast.m implementation file and import
the XPathQuery.h interface file. Add the
following line to the top of
WeatherForecast.m:
#import "XPathQuery.h"
After importing the interface file, we now have everything in
place to write our connectionDidFinishLoading: method, using
the XPath query language and libxml2 to parse the
XML document returned by the Google Weather Service. If you examine the xpathQueryString variables in each XPath
query, you will see how the data model maps onto the original XML
document returned by the weather service. Here is the new connectionDidFinishLoading: method along
with two methods (fetchContent: and
populateArray:fromNodes:) to take care of
some repetitive tasks:
// Retrieves the content of an XML node, such as the temperature, wind,
// or humidity in the weather report.
//
- (NSString *)fetchContent:(NSArray *)nodes {
    NSString *result = @"";
    for ( NSDictionary *node in nodes ) {
        for ( id key in node ) {
            if( [key isEqualToString:@"nodeContent"] ) {
               result = [node objectForKey:key];
            }
        }
    }
    return result;
}

// For nodes that contain more than one value we are interested in,
// this method fills an NSMutableArray with the values it finds.
// For example, the forecast returns four days, so there will be
// an array with four day names, an array with four forecast icons,
// and so forth.
//
- (void) populateArray:(NSMutableArray *)array fromNodes:(NSArray*)nodes {
    for ( NSDictionary *node in nodes ) {
        for ( id key in node ) {
            if( [key isEqualToString:@"nodeContent"] ) {
                [array addObject:[node objectForKey:key]];
            }
        }
    }
}

- (void)connectionDidFinishLoading:(NSURLConnection *)connection {

    days = [[NSMutableArray alloc] init];
    icons = [[NSMutableArray alloc] init];
    temps = [[NSMutableArray alloc] init];
    conditions = [[NSMutableArray alloc] init];

    NSString *xpathQueryString;
    NSArray *nodes;

    // Forecast Information ////////////////////////////////////////

    // Populate the location (an NSString object)
    //
    xpathQueryString = @"//forecast_information/city/@data";
    nodes = PerformXMLXPathQuery(responseData, xpathQueryString);
    location = [self fetchContent:nodes];
    NSLog(@"location = %@", location);

    // Populate the date (an NSString object)
    //
    xpathQueryString = @"//forecast_information/forecast_date/@data";
    nodes = PerformXMLXPathQuery(responseData, xpathQueryString);
    date = [self fetchContent:nodes];
    NSLog(@"date = %@", date);

    // Current Conditions ////////////////////////////////////////

    // Populate the current day's weather icon (a UIImage object)
    //
    xpathQueryString = @"//current_conditions/icon/@data";
    nodes = PerformXMLXPathQuery(responseData, xpathQueryString);
    for ( NSDictionary *node in nodes ) {
        for ( id key in node ) {
            if( [key isEqualToString:@"nodeContent"] ) {
                icon = [NSString
                  stringWithFormat:@"http://www.google.com%@",
                  [node objectForKey:key]];
            }
        }
    }
    NSLog(@"icon = %@", icon);

    // Populate the temperature (an NSString object) in F and C
    //
    NSString *temp_f;
    NSString *temp_c;
    xpathQueryString = @"//current_conditions/temp_f/@data";
    nodes = PerformXMLXPathQuery(responseData, xpathQueryString);
    temp_f = [self fetchContent:nodes];

    xpathQueryString = @"//current_conditions/temp_c/@data";
    nodes = PerformXMLXPathQuery(responseData, xpathQueryString);
    temp_c = [self fetchContent:nodes];

    temp = [NSString stringWithFormat:@"%@F (%@C)", temp_f, temp_c];
    NSLog(@"temp = %@", temp);

    // Populate the humidity (an NSString object)
    //
    xpathQueryString = @"//current_conditions/humidity/@data";
    nodes = PerformXMLXPathQuery(responseData, xpathQueryString);
    humidity = [self fetchContent:nodes];
    NSLog(@"humidity = %@", humidity);

    // Populate the wind (an NSString object)
    //
    xpathQueryString = @"//current_conditions/wind_condition/@data";
    nodes = PerformXMLXPathQuery(responseData, xpathQueryString);
    wind = [self fetchContent:nodes];
    NSLog(@"wind = %@", wind);

    // Populate the condition (an NSString object)
    //
    xpathQueryString = @"//current_conditions/condition/@data";
    nodes = PerformXMLXPathQuery(responseData, xpathQueryString);
    condition = [self fetchContent:nodes];
    NSLog(@"condition = %@", condition);

    // Forecast Conditions ////////////////////////////////////////

    // Fill the array (an NSMutableArray) of day names
    //
    xpathQueryString = @"//forecast_conditions/day_of_week/@data";
    nodes = PerformXMLXPathQuery(responseData, xpathQueryString);
    [self populateArray:days fromNodes:nodes];
    NSLog(@"days = %@", days);

    // Fill the array (an NSMutableArray) of day icons
    //
    xpathQueryString = @"//forecast_conditions/icon/@data";
    nodes = PerformXMLXPathQuery(responseData, xpathQueryString);
    for ( NSDictionary *node in nodes ) {
        for ( id key in node ) {
            if( [key isEqualToString:@"nodeContent"] ) {
             [icons addObject:
                 [NSString stringWithFormat:@"http://www.google.com%@",
                 [node objectForKey:key]]];
            }
        }
    }
    NSLog(@"icons = %@", icons);

    // Fill the array (an NSMutableArray) of daily highs/lows
    //
    NSMutableArray *highs = [[NSMutableArray alloc] init];
    NSMutableArray *lows = [[NSMutableArray alloc] init];

    xpathQueryString = @"//forecast_conditions/high/@data";
    nodes = PerformXMLXPathQuery(responseData, xpathQueryString);
    [self populateArray:highs fromNodes:nodes];
    xpathQueryString = @"//forecast_conditions/low/@data";
    nodes = PerformXMLXPathQuery(responseData, xpathQueryString);
    [self populateArray:lows fromNodes:nodes];
    for( int i = 0; i < highs.count; i++ ) {
        [temps
          addObject:[NSString stringWithFormat:@"%@F/%@F",
                    [highs objectAtIndex:i],
                    [lows objectAtIndex:i]]];
    }
    NSLog(@"temps = %@", temps);
    [highs release];
    [lows release];

    // Fill the array (an NSMutableArray) of daily conditions
    //
    xpathQueryString = @"//forecast_conditions/condition/@data";
    nodes = PerformXMLXPathQuery(responseData, xpathQueryString);
    [self populateArray:conditions fromNodes:nodes];
    NSLog(@"conditions = %@", conditions);

    [viewController updateView];
}
3.4. Populating the UI
Now that we’ve populated the data model, let’s create the
updateView:
method in our view controller. This is where we take the
data that we just parsed from the XML and push it into the current
view. Replace the updateView:
method in MainViewController.m with the
following:
- (void)updateView {

    // City Info
    nameLabel.text = forecast.location;
    dateLabel.text = forecast.date;

    // Now
    nowTempLabel.text = forecast.temp;
    nowHumidityLabel.text = forecast.humidity;
    nowWindLabel.text = forecast.wind;
    nowConditionLabel.text = forecast.condition;
    NSURL *url = [NSURL URLWithString:(NSString *)forecast.icon];
    NSData *data = [NSData dataWithContentsOfURL:url];
    nowImage.image = [[UIImage alloc] initWithData:data];

    // Day 1
    dayOneLabel.text = [forecast.days objectAtIndex:0];
    dayOneTempLabel.text = [forecast.temps objectAtIndex:0];
    dayOneChanceLabel.text = [forecast.conditions objectAtIndex:0];
    url = [NSURL URLWithString:(NSString *)[forecast.icons objectAtIndex:0]];
    data = [NSData dataWithContentsOfURL:url];
    dayOneImage.image = [[UIImage alloc] initWithData:data];

    // Day 2
    dayTwoLabel.text = [forecast.days objectAtIndex:1];
    dayTwoTempLabel.text = [forecast.temps objectAtIndex:1];
    dayTwoChanceLabel.text = [forecast.conditions objectAtIndex:1];
    url = [NSURL URLWithString:(NSString *)[forecast.icons objectAtIndex:1]];
    data = [NSData dataWithContentsOfURL:url];
    dayTwoImage.image = [[UIImage alloc] initWithData:data];

    // Day 3
    dayThreeLabel.text = [forecast.days objectAtIndex:2];
    dayThreeTempLabel.text = [forecast.temps objectAtIndex:2];
    dayThreeChanceLabel.text = [forecast.conditions objectAtIndex:2];
    url = [NSURL URLWithString:(NSString *)[forecast.icons objectAtIndex:2]];
    data = [NSData dataWithContentsOfURL:url];
    dayThreeImage.image = [[UIImage alloc] initWithData:data];

    // Day 4
    dayFourLabel.text = [forecast.days objectAtIndex:3];
    dayFourTempLabel.text = [forecast.temps objectAtIndex:3];
    dayFourChanceLabel.text = [forecast.conditions objectAtIndex:3];
    url = [NSURL URLWithString:(NSString *)[forecast.icons objectAtIndex:3]];
    data = [NSData dataWithContentsOfURL:url];
    dayFourImage.image = [[UIImage alloc] initWithData:data];

    [loadingActivityIndicator stopAnimating];

}
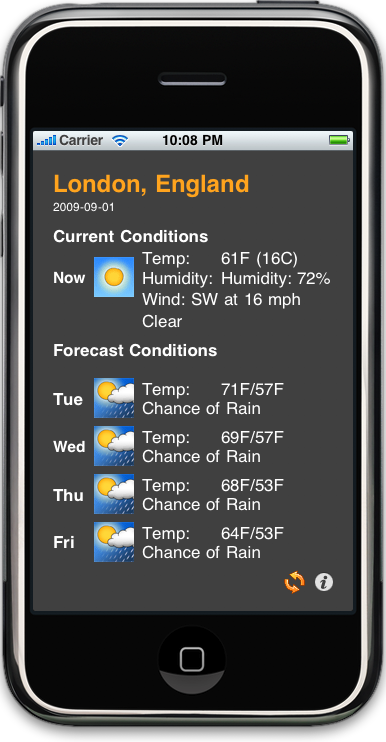
We’re done. Click the Build and Run button on the Xcode toolbar
to build and start the application in iPhone Simulator.
Once the application starts up, if all goes well you should get
something that looks similar to Figure 6. There is, after
all, almost always a chance of rain in London.
3.5. Tidying up
There are several things you can do to tidy up this bare-bones
application. First you should clean up the UI, as it’s pretty untidy
when the application opens. The easiest way to do this is to have all
your labels start as blank, and then populate the text when the view
finishes loading the information from the Google Weather
Service.
You might also want to add reachability checks when the application opens, and add
some error handling in the connection:didFailWithError: delegate method
inside the WeatherForecast class.
You should also allow the user to choose which city to use by adding a
text entry box on the flipside view, or perhaps even a map
view.